When last we left our protagonist, they had deployed in a nice flat open field (honestly, who in the right mind would pick that for battle ground). I fought this out 2 weeks ago and apparently didn’t keep as detailed of notes as I should have because I expected to write it up last week. It’s hard to believe that the last battle was back in October. In some ways it seems like it was just last week.
So, let's get to it.
The Count won the initiative and opted to let the Earl go first.
On the last card of the initiative the Earl turned a move card, and his mighty army surged ahead, one move segment except for Captain A. Noid who managed two segments, and with his eyes on the Count’s weak flank to his front had his cavalry unit oblique to its right.
The Count also turned a ‘Move’ card in his first initiative, and Cuss-a-lots cavalry command already dreaming of how impressed the Tavern Wenches would be by their exploits sprinted 2 move segments forward, but were unable to contact the Mercenaries stopping a little over 1 inch shy of their opponents.
Curt-the-Lesser moved 3 move segments, after the cannon fired to no effect (honestly, I don’t’ know why I bother with anything shooty if it isn’t in the flank, it doesn’t seem to do anything). The Arquebus armed Skirmishers moved into firing distance and unleashed a thunderous blast of gunpowder, flame and smoke as if the demons of the Earl’s nightmares had come to life. When the smoke cleared, the results were… underwhelming, inflicting no damage, (they apparently forgot to load any shot).
While Captain TBD on the Counts’ left flank plodded ahead one segment with a wary eye on the surging advance of Captain A. Noid opposite him as his command moved into an echelon formation. It was at this point that Captain TBD sent his first messenger to the Count asking for assistance in reinforcing his pitifully weak flanking force.
Next the Count’s forces turned an ‘Uncontrolled Advance’ Card. All of the Count’s commands except for Curt the Lesser pass the test, and Curt’s command moves forward one segment.
The Count’s forces finished the initiative with a Missile Reload card.
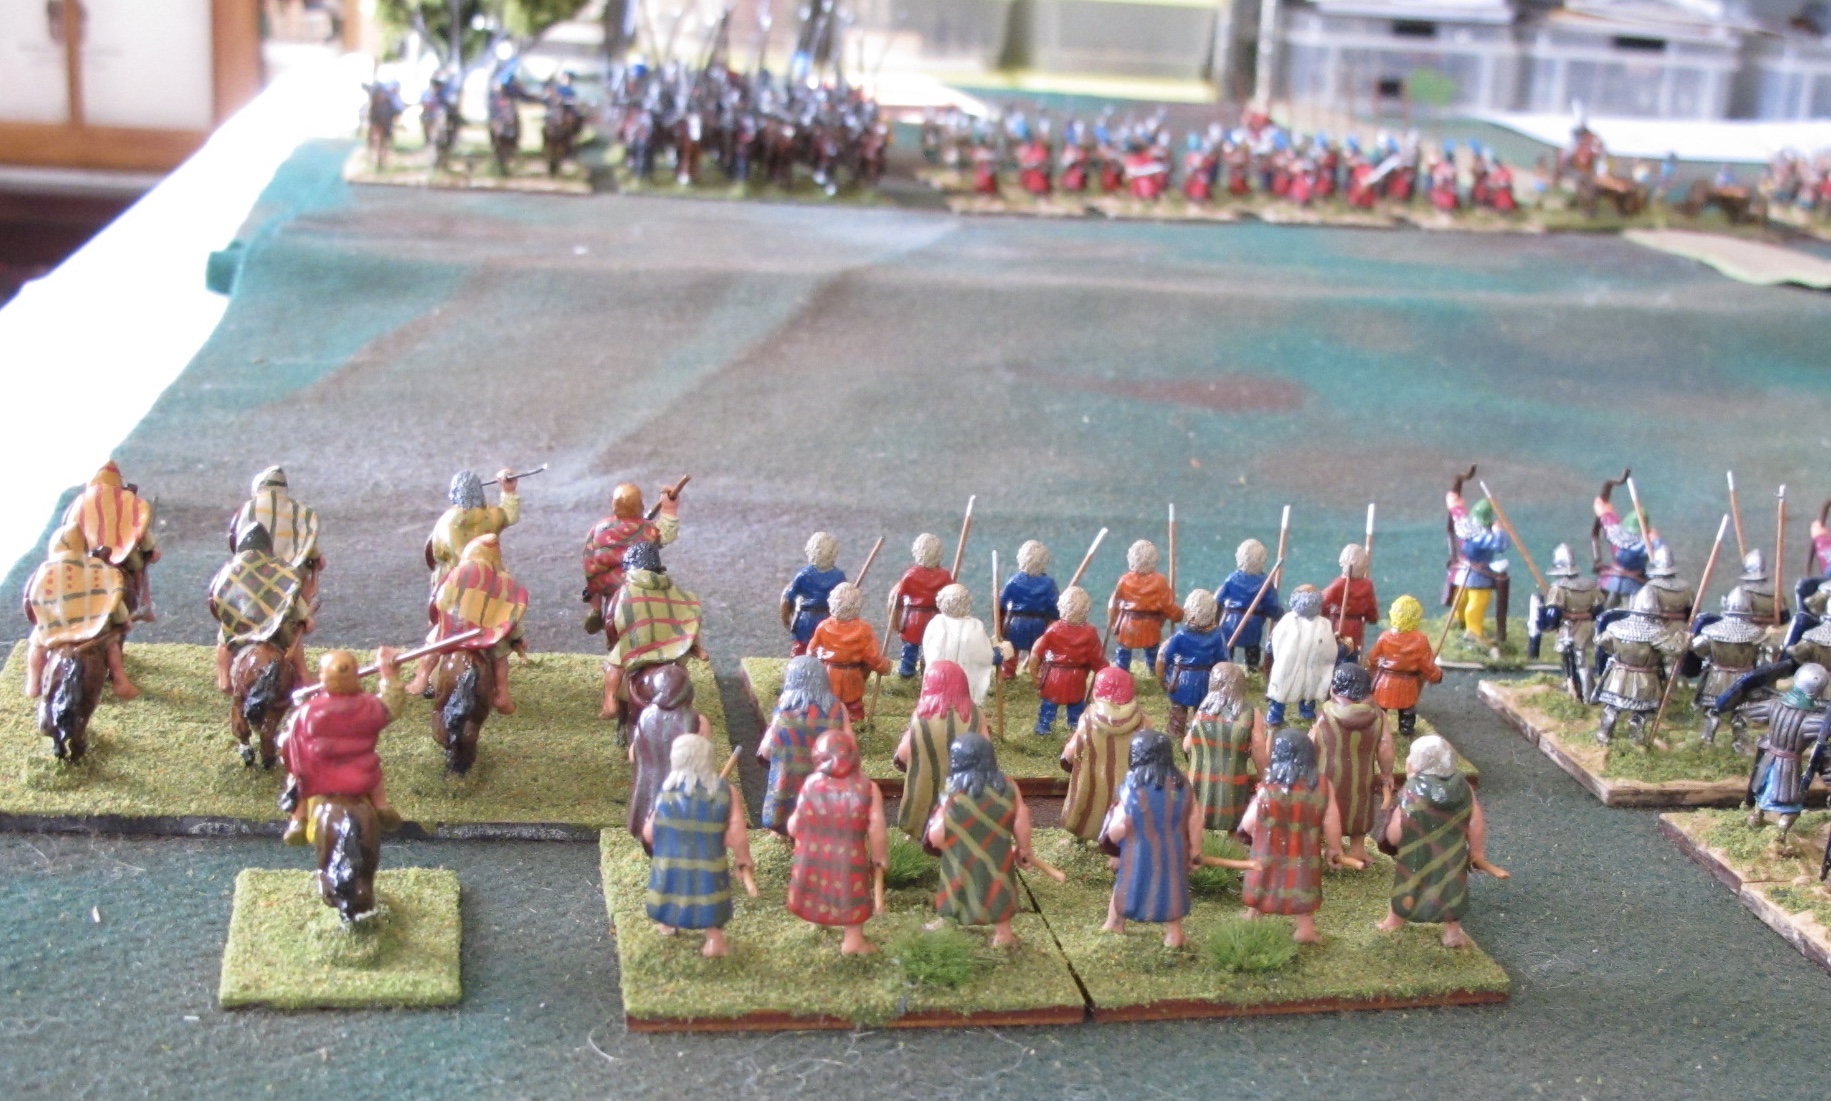
Overview at the end of the first initiative. The Earl's forces on the left, the Count's forces on the right.
End of the first Initiative.
Close up of the action between Cuss-a-lots knights on the right and the Mercenaries on the left at the top of the photo. And a portion of Curt the Lessers command on the lower right and Wrong Way Wray's command on the lower left.
The second initiative was a tie. Reshuffle the decks and go again.
The third initiative saw the Earl win by 4 and he opted to go first.
The first card turned was a Move 1 Command card. And the Earls right flanking command under Captain A. Noid wins 2 move segments! The Medium Cavalry charge towards the Whirling Mass light cavalry opposite them, who fire and retire. “Now with the rabble out of the way I can roll up this pitiful flank” cackled Wrong Way Wray.
It was at this point that Captain TBD sent his second messenger to the Count begging for reinforcements.
Next the Earl turned a ‘Courage’ card, as the Yellow Shield Knights were considered Fearsome after the last battle, the Mercenary command had to test, and the Saxon Infantry failed, and fell back in disorder.
The Earl’s last card was a Maneuver Card, and his Heavy Crossbowmen opted to turn ninety degrees to flank their opponents, trusting to the crappy shooting to continue by the Count’s forces. This allowed them flank shots at both the Skrimish and Formed Arquebusers. Unfortunately, given then range, they opted to hold their fire until they could move closer and roll something other than a D4.
The Count’s third initiative was mostly useless cards with the exception of a Missile Reload. Both the Arquebus and crossbow armed skirmishers reloaded and let fly… The crossbows naturally missed. BUT, the skirmish Arquebus actually hit something an inflicted a two stand loss, BUT… since it was skirmish fire the result was that the skirmishers opposite them were disordered. Which doesn’t cost any morale chips, but does put the Earl’s skirmishers down one for firing.
End of the Third Initiative.
Captain TBD of the Count's forces on the upper left. Captain A. Noid's forces of the Earl on the upper right. Captain A. Noid is already salivating at the possibility of his cavalry turning the flank.
The Fourth initiative is where the pace finally started to pick up. The Count won the initiative by 2 and opted to go first. The first card turned was the ‘Uncontrolled Charge’ card. The Yellow Shield Knights of Cuss-a-lots command won three move segments and the other unit of Knights won two move segments. It could be a bad day to be a Mercenary.
The Yellow shield knights use one segment to contact the Mercenary Cavalry, one segment to initiate Melee which they win, but only manage to inflict a one stand loss, pushing the Mercenary Cavalry back.
The other Unit of the Count’s Knights uses one move segment to contact the Pict Mercenary spearmen, and one segment to initiate Melee and inflict a 2 stand loss. They also doubled the defensive die roll, thereby routing the Picts, who pass through the unformed Saxons. Both units of Knights pass their pursuit checks and stand fast.
The Earl failed to turn any cards that could be acted on in his phase of the fourth initiative.
End of the forth initiative from the Earl's point of view.
The first of the Northern Barbarian mercenaries routing, in this case Picts. Spoiler alert, they'll soon have company. Someone should tell the Earl that cheap Mercenaries are normally not really a bargain.
The Earl won the fifth initiative by 2, opting to go first. His only usable card was undisciplined missilery, which failed to inflict any hits, but left his units unloaded. It was around this time that the Earl drained his first flagon of wine.
The Count then promptly turned a ‘Lull’ card, and the Earl seized the initiative turning a Melee card which couldn’t be used.
The Count next turned another ‘Uncontrolled Charge’ card. The Yellow Shield Knights win two move segments, contact and melee the Mercenary Cavalry inflicting 1 stand loss and doubling their die roll. Since they doubled the die roll on a unit that was already disordered, the Mercenary Cavalry route.
The other unit of the Count’s Knights contact the Saxon Infantry and initiate melee, winning the die roll 7 to 1. The Saxons take a two stand loss and since their roll was tripled they route unralliable.
At this point one of Cuss-a-lots aids heard him cackle “this will impress the Tavern Wenches even more than my new Codpiece”.
View of the routing mercenaries from the Earl's perspective.
Cuss-a-lot's knights have seen off the nasty, smelly barbarian mercenaries and are now nicely positioned to roll up the Earl's flank. You'll notice 6 rocks on the routing units which represents 6 lost moral chips, given that the Earl only had 14 morale chips to start, things aren't looking good early on.
View from the eastern flank of the battle field. This better shows the mass of Cuss-a-lots cavalry at the top of the photo sitting on the flank of the Earl's infantry just waiting for either a maneuver card or to win 2 or more move segments so they can use one segment to maneuver.
The sixth initiative was won again by the Earl for two cards. The Earl turned a ‘Look to the King’ and then a ‘Move’ card. The Routing Mercenaries made their obligatory router move and skedaddled off the table, causing the Earl to bellow “Damn their disloyal hides.” With his left flank now gone, the Earl switched from wine to distilled spirits.
Captain A. Noid rolled up one move segment, and started side stepping and shifting units to prepare for the inevitable turning of the flank by Cuss-a-lots knights.
Wrong Way Wray rolled up two move segments ordering his Cavalry to pull back and turn to face the Count’s Knights, while his Halberd unit moved into contact with one of the Earl’s units of Swordsmen.
The only card the Count had he could act on was a ‘Move’ card. Cuss-a-lot had oen move segment, not enough to allow him to change facing, so he repositioned his units, pulling the Yellow Shield Knights back to the flank of the Earl’s Swordsmen while his other unit of Knights moved forward, dreaming of rolling up the Earl’s line.
The Earl's view of the battle field at the end of the 6th initiative. His left flank is looking a little shaky. But on his left flank Captain A. Noid's cavalry on the far right, is behind the Count's skirmishers and almost on the flank of the Count's Spearmen. The pesky whirling mass light cavalry of the Count is is the red spec in the upper right corner.
The view from the Count's perspective. His Knights on the right flank ready to turn and cause chaos. But his left flank is looking a little shaky with his (red) Light Cavalry way back at the moment. while the Earl's Medium Cavalry (green) is getting close to be able to turn the flank.
Close up of Curt the Lesser (bottom) and Wrong Way Wray (top). Note Wray had turned his cavalry toward the Knights flanks.
The seventh initiative was won by the Earl, with the first card turned being ‘Melee’ card. As the Earl’s Swordsmen and Halberds were already in contact battle was joined. Unfortunately, the superior weapon advantage of the Halberd over the Sword was to great and the Swordsmen lost a stand and routed (having lost the roll 1 – 4, being tripled results in a route unralliable).
The next card was an ‘Uncontrolled Charge’ and the other unit of Swordsmen charged into the Count’s Spearmen to their front, inflicting one stand loss on the Spearmen, but failing to double the enemy roll. While the Earl’s Medium Cavalry charge the Count’s skirmishers who evade.
The only useful card the Count turned on his move was the ‘Engines of War Reload’ card.
View before the Melee
The eighth initiative saw the Count win. With his only useful card being the ‘Leadership’ card, which allowed him to Rally his Spearmen.
The Earl’s only useful cards was a ‘Move’ card which saw the routing Swordsmen unit dutifully run away closer to the table edge. While Captain A. Noid’s other Swordsmen unit moved into contact with the Spearmen opposite them. His Cavalry stayed where they were, hoping for a chance to change facing.
Wrong Way Wray could only eek out one move segment, moving his Cavalry forward towards the flank of Cuss-a-lots Knights. His Heavy Crossbowmen launched a volley into the flank of the Count’s Skirmish Arquebusiers inflicting a 3 stands loss! Finally, shooting actually did something
A bit of lull in the action. The East flank of the battlefield. At the top of the photo the Count's Halberds under the command to Captain TBD has seen off the Swordsmen opposite them. The Count's Spearmen are in contact with the Earl's other unit of Swordsmen. The Earl's Medium Cavalry (green) patiently waits for a chance to turn 90 degrees to the left. And the Count's Light Cavalry (red) waits to do something.
The ninth initiative was again won by the Count. The first card turned was a Leadership card and the Count proved successful in bringing both of his Knight units back into good order.
The next card was a Melee card, and the Spearmen vs. Swordsmen battle continued, with the result being a tie. Both units had the same Morale die, which meant the Spearmen won as they initiated the Melee, disordering the Swordsmen.
This was followed by a ‘Move’ card. Cuss-a-lot had a near maniacal gleam in his eye as he mumbled, “surely this time I can change facing and roll up this annoying line of rabble to my left.” The die were rolled and the Cuss-a-lot’s roll stopped on …. 1. No move for him. The Count next rolled for the command and… another 1 - So much for impressing the Wenches.
Curt the Lesser rolled up 3 move segments, side stepping his skirmishers to clear the line of fire for the formed Arquebusiers who drew swords and advanced into the Earl’s skirmishers who wisely opted to evade. Curt’s unit of Pikemen took one segment to sidestep, one to move into the flank of the Earl’s Heavy Crossbowmen, and one segment to initiate Melee, inflicting on stand loss on the Heavy Crossbowmen. Meanwhile the Halberdiers advanced.
Captain TBD, on the Count’s hard pressed left flank also won 3 move segments. The Whiling Mass light cavalry moved to the flank of the enemy medium cavalry and unleashed a torrent of arrows winning the roll by 9! However, as it was skirmish fire the net effect was to inflict 1 stand loss. Captain TBD then launched his Halberdiers into the Earl’s skrimishers, who promptly evaded. This action resulted in exposing the flank of the Earl’s Heavy Crossbowmen, which the Count’s artillery promptly showered with round shot, inflicting a 1 stand loss.
The Earl’s phase of the ninth initiative which was abysmal, with the only useful card being ‘Leadership’ and every roll failing.
Sorry, no photos. They looked fine on the camera screen, but too blurry to use on a bigger screen.
The tenth initiative saw the Earl once again win. The Earl’s first card was a ‘Melee’ card, the Earl also played the ‘Favor of the Gods’ card he had been holding and launched his Swordsmen into the Count’s Spearmen. When the dust had cleared the Swordsmen lost the roll by 1 and as they were already disordered, forced them them to rout.
The next card was a ‘Move 1 Command Group’. The Routers continued the mad dash to the rear and Captail A. Noid’s right flank command won two move segements. The medium Cavalry promptly turned left 90 degrees, drew a bead on the flank of the artillery, and thundered forward, just shy of making contact.
The Count turned mostly useless cards except for a ‘Missile Reload’, the Medium Infantry Arquebus unit cut loose on the hapless Spearmen to their front inflicting a one stand loss and reloaded.
Oh so close. The cavalry are unformed as indicated by the front and rear rank facing each other.
The eleventh initiative was won by the Count, who turned a ‘Move 1 Command Group’ card. By this point the Count had given up on Cuss-a-lot’s Cavalry command doing any type of maneuvering, and instead opted to move Curt the Lesser’s Command.
Curt the Lesser rolled up two move segments. His first action was to charge his unit of Pikes into the flank of the Earl’s Heavy Crossbows. Curt won the combat by a roll of 12 – 1 and the Earl’s Crossbows were turned into a sticky goo smear being obliterated. Once again, it was bad, very bad, day to be a Heavy Crossbowmen for the Earl. The crossbows have been in two battles and vaporized before the end of both.
Smelling blood in the air the Arquebusier’s of Curt’s command fired into the Spearmen to their front inflicting another two-stand loss.
At this point, the Earl was out of moral chips and had started paying the Count chips.
The first card the Earl turned during his phase was a ‘Move’ card, and his routers happily continued streaming to the rear. Wrong Way Wray began to withdraw in an attempt to save what he had left of his command. Captain A. Noid won two move segments, a started to pull his infantry back. However… his Medium Cavalry closed the distance to the flank of the Count’s artillery and started hacking away. The Cavalry inflicted one stand loss on the guns and forced the gunners to abandon the guns.
Pikes into the flank of the already battered Heavy Crossbowmen
Overall view of the battlefield from the East flank. At the top, Cuss-a-lots knights still haven't managed to make that left turn into the Earl's flank. The EArl's crossbowmen are no more. And the Earl's medium cavalry are still in spitting distance of the flank of the Count's guns.
And the final act of defiance.
The Earl's Medium Cavalry under the command of Captain A. Noid finally charge home on the flank of the Count's guns, inflicting one stand loss and forcing the gunners to abandon the gun. Sadly, the Earl will not be in a position to cart off the guns at the end of the battle.
At this point the Earl conceded the battlefield. While the Count with a relatively fresh Cavalry unit to the rear of his entire command opted to let the battered and demoralized forces of the Earl retreat.
Chalk up one more win for Count William. Billy is going to start to get a big head.
After the tense 2nd battle of Bridgeton, this one really seemed rather anticlimactic. I’ll attribute it to the Earl’s forces being pretty well battered with a lot of hastily trained Levy thrown in to make up the losses from the last trouncing. However, the Count’s forces didn’t exactly cover themselves in glory either this time out.
After the 3rd initiative I thought that Grand Captain Cuss-a-Lot would be rolling up the flanks, but he rather quickly stalled and just sat there waiting for a maneuver card to change facing, which never showed up. On the Earl’s side, if Captain A. Noid’s cavalry would have turned the flank before the Earl was out of moral chips, he had the potential to wreak havoc after running off the cannon crew – alas, too little to late.
This will probably be the last battle of this campaign season. Both forces are tired from a lot of marching and fighting. Plus the Levy need to get back to the fields to tend to the crops. The next logical battle would be a Siege of Earlstown, but I’m not in the mood for a siege.
I think the Count can haul off all the wine from the Village of Muscato, and probably multiple wagons of corn from Maizeland. The Count will probably station several units of scouts in Muscato as well, just to make sure the Earl doesn’t get sporty, and to prevent him for obtaining any provisions for a possible siege.
Will the Earl spend some money on decent quality mercenaries next time? Will any of the other realms get into the action? King Calvin of Hos Hobbes to the North of the Earl’s demesne may soon take notice if the Count has too much success. And mayhap the realms to the south of the Count sense an easy opportunity to expand their holdings? Only the dice know.
Time will tell.
So much lead, so little time