
I've taken an interest in the Stargrave rules, for SciFi skirmish type games. I guess it's sort of a return to 40K, but (hopefully) without the once a year rule changes. This had me looking at my terrain, which is woefully lacking in the scatter type of terrain needed for skirmish games.
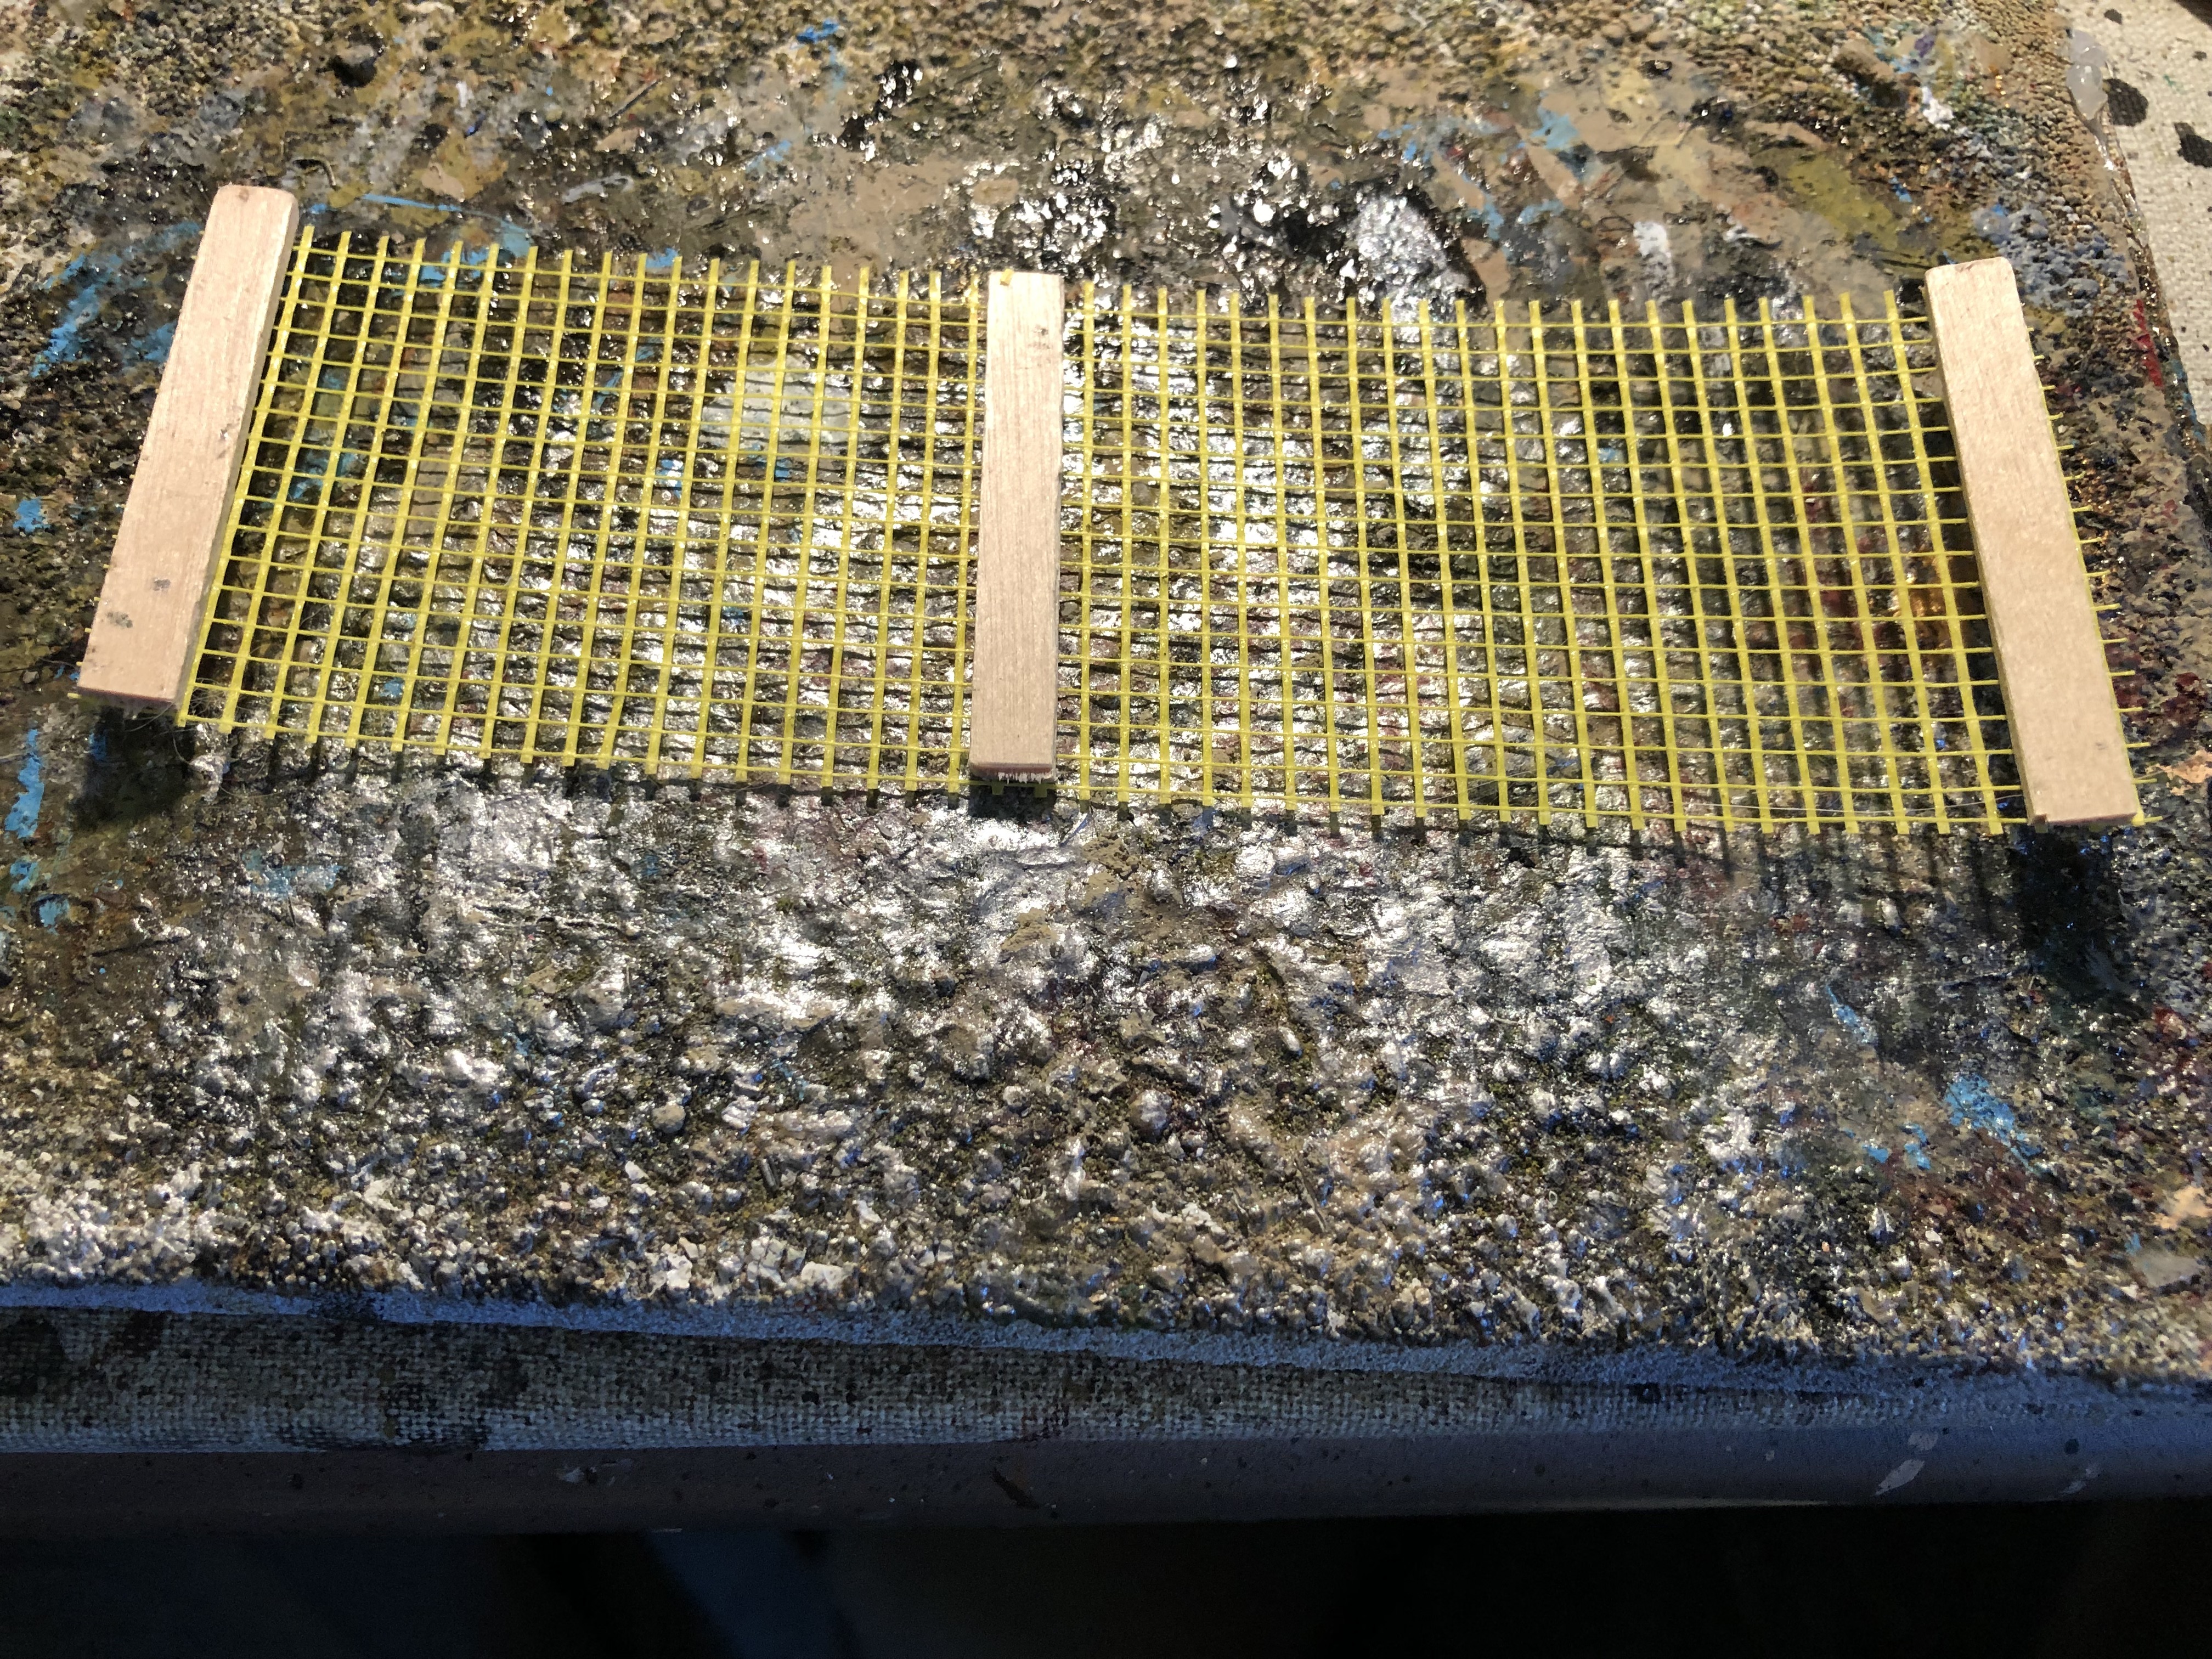
My solution was to slap together some fencing. The process is quick, easy, and inexpensive (all from materials I had laying around the house). So, after grabbing some craft sticks, skinny sticks (like coffee stirrers but thicker), and some sheet rock mesh fiber tape I had left over from the renovations when we moved, and I started building fences.
The process goes quickly, and using a hot glue gun avoids the need to wait for the glue to dry between steps.
So far I've only done with the 28mm sized fencing. But I think you should be able to cut the tape down to accommodate 15mm and 6mm figures as well, although for 6mm toothpicks would probably work best for the fence post.
The materials are gathered.


Take care and enjoy what's left of the nice weather. Snow starts in about a month and half, or sooner.
So much lead, so little time
The handful of surviving invading forces of Rubishland have retreated back to their side of the original border. The one platoon of T-55’s that left the table made it into the Wilhelmsland fertile plains caused some panic, destroyed some crops, but was hunted down and destroyed by Helicopters before even coming in sight of the Wilhelmsland oil fields.
Clearly the next several months of game time will be spent re-equipping and training new troops for both sides. I’ll have to figure out a way to determine how quickly the sponsor States of the two protagonists can ship them new equipment. It should be fairly easy for the U.S. to send the old M-60 series tanks and M113’s from Europe to Eurica (after all it’s just down the coast of Africa from Europe) as the US upgrades to M-1’s and Bradley fighting vehicles (it is 1985 after all). And the Soviet Union has more equipment than they know what to do with – unless they decide to shoot through the Fulda Gap and take Germany, so they can spare some for a Staunch Communist Ally.
President for Life Sanford will not allow this insult to the superiority of Rubishland military prowess to go, and he will be back. He has a lot of Generals he can execute until he finds one that knows how to win.
So, on to the Butchers bill for the last action.
The attacking Rubishland forces lost the following in the Battle of the Gap:
· 12 T-72 platoons destroyed
· 10 T-55 platoons destroyed
· 8. BMP platoons destroyed
The rules have a mechanism to determining how many ‘destroyed’ units can be repaired and brought back, but since Rubishland fled the field, I’m ruling none of the above come back (at least not in Rubishland service – the reserve units of Wilhelmsland may be getting some T-72’s and T-55s).
The units that failed their quality check also have a chance to return, they weren’t destroyed just had significant mechanical damaged/failure, key personal were killed, etc. Rubishland had the following forces fail their quality check in the battle:
· 9 T-72 Platoon’s – of which 3 were able to retreat back to Rubishland
· 7 T-55 Platoon’s of which 2 were able to retreat back to Rubishland
· 5 BMP Platoons of which 2 were able to retreat back to Rubishland
· 1 BRDM-2AT Platoon which was able to retreat back to Rubishland
Wilhelmsland losses in the battle were:
· 5 M-60A3 Platoons of which 1 was able to return to service
· 5 Marder Platoons of which 1 was able to return to service
Wilhelmsland also had the following Platoons fail their quality check:
· 6 M-60A3 platoons of which 2 were able to return to service
· 2 M-60A1 platoons of which 1 was able to return to service
· 1 Marder platoon which was able to return to service
· 9 Platoons of dismounted Infantry of which 3 were able to return to service
The attacking Rubishland forces represented a little over 2/3’s of the total Rubishland uniformed forces so they will most likely behave for a while. Wilhelmsland started with 4 Brigades, (2 each on the borders with Rubishland and Gardenstan) the 2nd Brigade which fought the two actions in ‘The One Day War’ as it is being called will be down approx. 50% for some time.
There may be a few news reports posted regarding the war and the world response… but even in 1985 it wasn’t wise to believe everything the news told you.
On the Outlandishian Chronicles front, look for a return to the Renaissance era in the next month or so. The leaves are starting to turn and the overnight temps are in the high 40’s to low 50’s, and for some reason I equate gaming that era in the fall-winter time frame.
Sorry about the lack of photos in this post, but I haven’t really been painting the past couple of months.
Until next time,
So much lead, so little time
Welcome back to Eurica. It may seem like two months have gone by since Rubishlandia invaded Wilhelmsland, but it’s actually only been about 8 hours in game time. It took the Rubishlandian forces a long time to reorganize and resupply their battered formation. If the next battle isn’t a resounding victory I expect President for Life Sanford to have some choice words for the commander of his forces, (hopefully the commanders head will still be attached to his shoulders when those words are spoken).
After finally getting their act together the Rubishlandian forces have set off through the Forlorn Gap, a plain that runs between 2 ridgelines and is the only tank friendly route to the Northern most Wilhelmsland oil field's and refinery. Oberst Richter has issued his forces a no retreat order. The remenants of 2nd Brigade are all that stand in the way to stop the invaders from sweeping down through the fertile central region of Wilhlelmsland and gobbling up the oil and coal producing areas. 3rd Brigade with their M-60A1’s and M3 halftracks are setting up a defense outside the oil fields, but Oberst Richter and 2nd Brigade need to stop the attack here.
The Unit cohesion rules were modified for the defenders, and lowered to maintaining cohesion distance at the company level vs. battalion due to the nature of the scenario.
Since in the real world a little more than 6 hours since the last battle. As a refresher the last battle report can be found Eurica Goes Hot
And the after-battle results and available forces can be found here
The Rubishland order of march is a Regiment of T-55’s followed by the remains of the BMP Motorized Rifle Regiment to clean up any infantry that is bypassed with a Regiment of T-72’s bringing up the rear to eliminate anything that might be left. After the earlier losses President for Life Idi Sanford doesn’t want to needlessly risk his T-72s.
All of the Wilhelmsland Infantry are dug into well prepared positions, (as long as they don’t fire or move the enemy will have to get within 1” to spot them). There is a company of M-60A3’s dug in at the far end of the plain. All the remaining Willhelmsland vehicles are in turret down positions (stationary vehicles in cover are spotted at 10”, so they should all get one round of surprise flank shots at the advancing force – at least that is the plan.)
To win the Rubishlandian’s need to exit at least a battalion’s worth of vehicles (18) off the West end of the battle field (past the dug in tanks). Anything less than that is a win for Wilhelmsland.
The battle field (looking West). The Rubishland T-55 Tank Regiment nears the dug in Wilhlemsland defenders.

And a view with the units identified.


Turn 3
At the start of turn 3 the follow on Rubishland Motorized Rifle Regiment can be seen in the distance (it will be on table turn 4). The Rubisland T-55 regiment moves 3” (300 meters) and spots the dug in Willhelmsland infantry of Charlie Company, with the rest of the right most Battalion of T-55’s maneuvering to engage the infantry. While the remainder of the tank Regiment continues on with their mission objective.
The Infantry of Charlie Company conduct overwatch fire on the tanks, as does the infantry of Bravo Company. When the smoke clears 2 Rubishland T-55s have been hit, with one tank being destroyed and the other shrugging off the impact (clearly the Dragon gunners were having a bad day). Next the Marder’s of Charlie Company fired their Milan missiles, getting one hit but failing to cause a quality check.

The T-55 battalion then returned fire, targeting the dug in infantry hitting all 3 platoons but they managed to all pass their quality checks.

Turn 4
The 2 Tank battalions of the T-55 Regiment continue on, while the remaining battalion continues to engage the infantry. The remnants of the Motorized Rifle Regiment moves on board headed towards the infantry and Marders.
The Wilhelmsland Infantry of Charlie Company fire their Dragons at the T-55s while Bravo Company splits its fire between the T-55s and the T-72s leading the advancing MRR. Destroying 1 T-55 and causing one to fail its quality check and be removed. The Marders of Charlie Company fire at the T-55s and the Marders of Bravo Company fired at the T-72 and BMP’s, Causing 1 T-72 to fail their quality check, and destroying 2 BMPs.
The T-55’s then fire at Charlie Company, hitting all 3 platoons, all of which make their saving throws (the Rubishland infantry may have to root them out the old fashion way). The MRR fires at the dismounted Bravo Company infantry and their Marders, and after a truly impressive number of 1’s and 2’s rolled, manages to force one infantry platoon to fail its quality check and be removed.
The remaining Wilhlemsland forces opt to not move.

Turn 5
The T-55’s continued West, spotting the dug in M-60A3’s of Delta Company and changed formation. The T-55’s battalion engaging the Infantry decided to leave them to the rest of the MRR to deal with, and headed West after the rest of their Regiment. The MRR crated a massive traffic jam as they tried to maneuver to engage Bravo and Charlie Companies. While a Regiment of T-72’s could be seen in the distance (on table next turn).
Charlie Company was left with only 1 platoon able to fire, which missed. Bravo Company fired everything they could resulting in Both remaining T-72 platoons of the MRR being hit and failing their Quality Checks, thus being removed. They also managed two destroy 2 BMP's.

The Rubishland T-55’s were about to have a very bad day. The tanks of Delta Company to their front fired, destroying one platoon and causing another to fail their quality check. Next the survivors of 2nd Battalion, 2/2 Armor fired with a vengeance, and end up destroying 1 T-55 and causing another to fail a quality check. Maybe revenge is a dish best served cold? Next Bravo Company took their flank shots, destroying 2 platoons and causing one to fail a quality check. Alpha Company then fired, destroying 1 platoon.
The M-60A1’s of Bravo Company, 1/3 Armor were out of range as was Charlie Company. The Infantry Milan’s opted not to fire at this time.

After the initial shock of the onslaught, the Rubishlandian’s opened fire, the MRR destroyed 1 Marder and caused another to fail a quality check, and 1 Infantry platoon to fail a quality check. The T-55’s unload on Delta Company, destroying one platoon and forcing one to fail a Quality check. They way to the Refinnery/oil fields is almost open… or is it?
In the Wilhelmsland turn of the Segment (I know, all the overwatch fire made it seem like they already had their turn, but they haven’t). Oberst Richter called for fire and both 155mm batteries responded, he also called for an airstrike. The artillery forced 2 BMP Platoons to fail the quality check. The air strike is off target and only manages to suppress one T-55.
View from Delta Company perspective (what’s left of it). Wilhelmsland did not make any move.

Turn 6
With most of the Wilhelmsland forces now revealed, the Rubishland Commander called in his own air strike and artillery. The air strike targeted Alpha Company on the hill, the Su-17 is on target and causes one tank platoon to fail their quality check.

The artillery targeted the woods and hill where the remnants of 2nd armored battalion were dug in, causing one platoon to fail its quality check and be removed.
The T-55’s execute a contact right drill, and close with the remains of 2nd battalion, which brings them within range of the Bravo Company, 2/3 Armor M-60A1’s. And the BMP’s maneuver to fire on the Marder’s while others advance and dismount infantry to clear out the defending infantry. And the T-72 Regiment comes on table.
The Wilhelmsland Overwatch fire, the Marder’s manage to destroy 1 BMP and the Infantry destroy another. 2nd Battalion tanks fire and the T-55’s, destroying one and causing 2 to fail their quality checks. Delta company fires and fails to do any damage, nothing else is in range at the moment.
Rubishland fires back, with the T-55’s destroying one 2nd Battalion tank and forcing another to fail a quality check. The MRR fires at the Marder’s, destroying the last Marder of Bravo Company, fire at the infantry was ineffective.
In the Wilhelmsland portion of the turn, artillery and air strikes are called, but the calls to Brigade artillery go unanswered. The Battalion Mortars are targeted on the dismounted Rubishland infantry, suppressing one platoon.

Turn 7
The Rubishland commander started the turn by calling in an air strike on the sole remaining tank of Delta Company, and artillery on the Marder's of Charlie Company , managing to suppress all of the targets.
The remains of the T-55 Regiment focused on the remains of 2nd Battalion, while one tank commander rememberd his orders and tries to slip past the remains of Delta Company. This move brings all of the remaining T-55’s into range of the M-60A1’s of Bravo Company, 1/3 Armor, who take their overwatch shots, along with the remains of 2nd Battalion and Delta Company with the net result of one T-55 platoon destroyed and one failing its quality check.
The Rubishland MRR still bogged down with trying to clear the 2 companies of The Marder’s fire their Malian’s in the overwatch fire phase and miss, (being down one to hit as a result of being suppressed). The T-72 Regiment moves forward, swinging to their left to avoid the ugly traffic jam the MRR has created, bringing themselves into range of the dug in infantry of Alpha Company (I was beginning to think Alpha wasn’t going to see any action). Alpha takes overwatch fire into the flanks of the T-72’s with their Dragons, all of which miss, but the unit is now spotted.
The dismounted Rubishland Infantry closes to engage their opposite number the dismounted infantry of Bravo and Charlie Company, outnumbered 3 to 1 and after suffering 10 hits, the sole remaining platoon of Bravo Company lost its quality and check and was removed.

Charlie Company was still at 100% and outnumbered their attackers by 1 platoon, when the smoke cleared all of the Charlie Company stands were gone, (they filed their quality checks, and Rubishland platoon remained.
In the Rubishland shooting phase the remaining T-55’s fired and scored hits, but failed to do any damage.
The MRR opened up on the remaining Marder’s, destroying 2 of the 3 platoons.
The T-72 Regiment opened up on the infantry of Alpha Company, causing all 3 platoons to fail their quality check and be removed.

Oberst Richter called in artillery targeting the MRR traffic jam with Bridage artillery, and the dismounted infantry with Battalion motars as well as an air strike on the advancing T-72’s. The Battalion mortars were off target, causing no damage except to some unoffending underbrush. The Brigade artillery suppresses 3 BMP’s and forces one to fail their quality check. The air strike suppresses 2 T-72’s and causes another to fail their quality check. Wilhelmsland opted to not move, ending the turn. (they’re happy in their defense positions with an additional cover save – not that it’s helping much).
Turn 8.
The Rubishland commander calls in artillery and air strikes, suppressing 3 M-60A1’s and 2 M-60A3’s, as well as forcing one M-60A3 to fail their quality check.
The surviving T-55’s continue to push towards the end of the table, as all of the Wilhelmsland tanks in range take overwatch fire (unfortunately for Willhelmsland, they are all suppressed and fire with a -1 penalty, destroying one platoon of T-55’s and failing to cause any damage to the other one.
The Rubishland dismounted infantry maneuver towards the sole remaining Marder of Charlie Company, while the BMP’s maneuver to engage either the Marder of the remnants to 2nd Battalion. The Marder takes a flank shot at one of the BMP’s and misses.
The T-72 Regiment continues forward with the left most Battalion shifting left to engage the tanks of Alpha Company. Alpha Comapy take their overwatch fire, hitting 4 and destroying one (units with a rate of fire of greater than one can split their fire between opposing units).
In the Rubishland fire phase the remaining T-55 takes a shot at the remaining M-60A3 of Delta Company, missing.
The BMP’s fire, destroying the last Marder of Charlie Company.
The T-72’s fire at the M-60A3’s of Alpha Company, destroying both remaining platoons, and ending the Rubishland phase.
Oberst Richter was near panic. He’d lost two Infantry Companies, and his tanks were taking a beating. He’d debated pulling some of his forward elements back, but the only terrain passible for tracked vehicles was through the gap. Granted that gap was now littered with destroyed Rubishland vehicles, but his forces had been sorely reduced as well. “Oh well, nothing for it but to embrace the suck and stand our ground” he muttered as he pointed out targets on his map for the artillery and aircraft.
This time the 2 batteries of 155mm guns had some effect. Suppressing 4 BMP’s and 4 T-72’s, as well as forcing one T-72 to fail its quality check.
The package for this air strike was armed with cluster bombs, Richter hoped they would be more effective than the previous strike. Richter said a silent prayer as the Harrier roared into view, when the dust and smoke cleared w T-72’s were suppressed and one T-72 and one RBDM-2AT forced to fail their quality check.
The Marder’s of Alpha Company moved to the edge of the woods and fired their Milan’s into the flank of the T-72’s, destroying 2 platoons and causing another to fail their quality check.

Turn 9
The Rubishland Commander was certain of victory just 15 minutes ago (in FFT3 a turn represents about 12 minutes), but now was having doubts after watching the left most battalion of his T-72 MRR get plastered by missile fire. President for Life Idi Sanford had explicitly told him to keep losses among the T-72’s to a minimum.
He called for artillery as well as his last air strike. The first artillery barrage targeted the Marder’s of Alpha Company, suppressing all 3 Marder’s. The other barrage targeting the remains of 2nd Battalion was off target by 300 meters, causing no damage. The air strike targeted the M-60A1’s of Bravo Company, 1/3 Armor, resulting in no effect.
The lone remaining T-55 headed off the table towards the Wilhelmland oil fields and refineries.
The MRR dismounted infantry entered the woods, looting the destroyed Marder’s of Charlie Company. The BMP’s maneuvered to fire on the remains of 2nd Battalion, as the T-72’s continue forward, ignoring the Marder platoon in their rear.
Wilhelmsland overwatch fire phase resulted in the Marder’s of Alpha Company firing at the rear of the T-72 formation with their Milan’s to no effect. The remains of 2nd Battalion fire on the BMP’s closing on their postion and force one to fail their quality check.
In the Rubishland fire phase the BMP’s target the remains of 2nd Battalion, destroying one platoon. (8 BMP’s shot, only one hit and it resulted in a destroyed result).
The remaining BRDM2-AT of the T-72 platoon shoots at the Marder’s of Alpha Company, and misses – the Sagger hitting a tree resulting in an explosion worthy of an episode of the A-Team (1980’s TV version), ending the Rubishland phase.
Oberst Richter again calls in artillery and air support. Apparently one battery was still repositioning after the last fire mission and was unavailable. The other battery must not have been completely set up as they missed the target by 200 meters, but still managed to suppress 2 BMP’s. As all the Wilhelmsland units in range had already shot in the Overwatch phase, and there weren’t any units willing to move, that ended the turn.

Turn 10
The Rubishland commander started by calling in artillery strikes on the Marder’s of Alpha Company, suppressing 2 platoons, and targeting the the M-60A1’s of Bravo Company, 1/3 Armor, with one platoon failing their quality check.
The BMP’s of the MRR swarm towards the remains of 2nd Battalion, trying to clear the ridgeline so the T-72’s can advance/exit the table. 2nd Battalion takes their overwatch fire, destroying 2 BMP’s.
The T-72’s continue forward, swinging to the right. The pass within range of the Delta Company, 1/ 2 Grenadiers dug into the woods and receive Overwatch fire from the infantry as well as Bravo, 1/3 Armor and 2nd Battalion, resulting in one destroyed and 2 failed quality checks.
The Rubishland BMP’s fire on the remains of 2nd Battalion and Bravo 1/3, causing one M60A3 and one M60A1 to fail their quality checks. The BRDM-2AT fires at the Milan’s to no effect.

Oberst Richter starts the Wilhelmsland phase with his requested air strike being denied, and only one battery responding to his call for fire, suppressing 3 BMP’s and causing one to fail their quality check.
Richter felt the time was right to finish this battle, and ordered the tanks of Bravo and Charlie Companies, as well as the Marder’s of Delta Company out of their position to close with and destroy the remaining Rubishland forces. It was a risk, but he needed to end this now. His troops were exhausted. Now was the time to act, the T-72’s had moved their full distance so they would not be able to fire in the overwatch phase.
The Marder’s advance and fire from the short halt, destroying one T-72.
The M-60A3’s of Bravo Company advance and fire, trusting to stabilization to fire on the move as they close the distance and destroy 2 T-72’s. Charlie Company advances from their concealed positions and fires destroying 2 T-72’s. The sole remaining tank of Delta Company fires from their dug in position in the middle of the gap destroying one T-72.

With the precious T-72 tank Regiment now nothing more than burning hunks of metal, the Rubishland survivors withdraw. The dismounted Rubishland Infantry hope their rides remember to stop and pick them up as they slink back to Rubishland. The exhausted Wilhelmsland defenders don't even make an attempt to pursue.
For the Commander of the Rubishland forces, I hope he was in one of the destroyed vehicles. Better a quick death in battle than the slow, agonizing death by torture that President for Life Sanford would provide as a reward for failure. Idi Sanford is not a forgiving person.
______________________
The 6 BMP's, two T-72's and one BRDM-2AT that survived the battle were almost back to the Rubishland border. All of the survivors worried about what would happen when they arrived, knowing the temper (and temperament) of President for Life Sanford, the comrades they left dead in Wilhelmsland may have been the lucky ones.
______________________
Oberst Richter took another long, deep drink of Jack Daniels. They had stoped the Rubishland incursion. And from the look of the battle field it would be some time before the Rubishlandian's could recover from the losses they had sustained, with over two thirds of their military smoking wrecks spread out over sovereign Wilhelmsland territory. But the cost... especially in the dismounted infantry, three companies - gone - well some would return once they recover from the injuries, but for the near term, 1st battalion, 2nd Panzer Grenadiers were combat ineffective. With luck we could probably field 1 and a half companies in an emergency.
And 2nd Battalion, 2nd Armor now consisted of 1 combat effective platoon. "I want to see the Chaplain, and then bring me another bottle", Richter called to his orderly. I wonder how quickly President Regan and the American Congress will authorize replacing our equipment losses he mused. And if we can get them to provide us with more modern equipment, we really need some proper anti-tank missiles, and TOWs would be ideal. I'm sure Gorbachev and the Soviets will have more equipment enroute to Rubishland by the end of the week. And only god knows what Big Daddy Fish and the Gardenstan's may do if they perceive weakness. Looks like we're the new proxy war in the 'Cold War'.
___________________________
Well, that was bloody. I'll do the after battle results and determine what was truly lost and what comes back in the next post. I have 40 destroyed vehicle markers, and I used 38 of them - I guess I'll "have to" place another Litko order if I plan on doing any more large battles.
As with the last battle I did this over the course of a week, playing any where from 15 minutes up to 2 turns an evening. While it makes it easier time wise, I do think some of the continuity gets lost, and I may have messed up things in one session that I was doing correctly in another session. I'd planned to introduce Helicopters on both sides for this battle, but opted not to, with only having limited blocks of time to play, and given the number of units involved, I think the added dimension of helicopters would have been to much.
All in all, I think I'm pleased with the rules (Fist Full of Tows 3), although I do wish they had more examples in the rules of how certain situations work. I've gone to the paragon of information, Youtube, for some tutorials, but even they don't all agree on certain aspects... so go with what feels right and try to be consistent I guess is the answer.
Until the next round of foolishness,
So much lead, so little time.


